The name table window
To open the Name Table, on the menu, click .
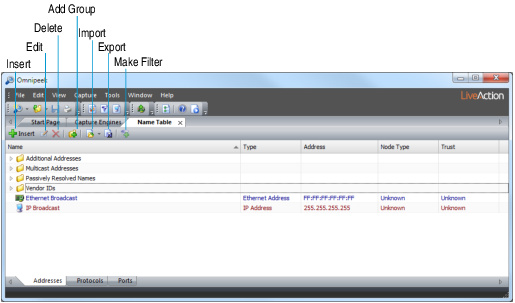
• Name: The symbolic name you assigned.
• Type: Type of address, port, or protocol.
• Address, Protocol, Port: The value that allows Omnipeek to identify the address, port, or protocol. For example, an address of the Type IP will show a dotted decimal number in the Address column and a protocol of the Type LSAP will show the one‑byte hexadecimal discriminator in the Protocol column.
The Address tab also has columns for Node Type and Trust, which are configured in the Edit Name dialog. See Adding and editing name table entries manually.
TIP: Click the column headings to sort entries in the table.
• Insert: Click to open the Insert Name dialog.
• Edit: Click to open the Edit Name dialog with the details of the selected entry filled in and ready to edit. When a Group is highlighted, it brings up the Edit Group dialog with the name of the highlighted Group ready to edit.
• Delete: Click to delete the selected entry.
• Add Group: Click to open the Add Group dialog in which you can create a new group folder. You can drag entries into and out of group folders.
• Import: Click to open a dialog in which you can specify the Names file to load into the Name Table.
• Export: Click to open a Save dialog to save the contents of the Name Table.
• Make Filter: Click to open the Insert Filter dialog with an untitled filter matching the information in the selected Name Table entry.